🛠️ Build Bold, Cool Fast, and Stand Out
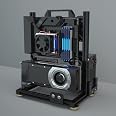
The egowz Creative Assembly Frame Test Bench is a versatile open-air aluminum chassis designed for professional DIY PC builders. It supports a wide range of motherboard sizes (EATX to ITX), dual PCIe slots, and flexible water-cooling configurations, ensuring superior heat dissipation and modular customization. Lightweight yet durable, it accommodates ATX and SFX power supplies plus multiple storage options, making it the perfect frame for cutting-edge, high-performance builds.


| Brand | egowz |
| Series | Creative Assembly Frame Test Bench |
| Item model number | MATX |
| Item Weight | 4.66 pounds |
| Product Dimensions | 18 x 13.4 x 8.83 inches |
| Item Dimensions LxWxH | 18 x 13.4 x 8.83 inches |
| Color | Black |
| Manufacturer | egowz |
| ASIN | B0CW5TPWN2 |
| Date First Available | February 22, 2024 |
A**N
Great quality test bench and easy to build . Lots of adjustability
Great test bench. Build quality is great and it came with a too tool kit making it helpful. Good fitment and functionality. Lots of adjustment and was easy to build with basic skills.
M**L
Simple & Cheap
This frame is “fine”. It does the job, and is meant for as a test bench frame. I’m using it for my main (mini) ITX computer though. It took me a long time to put together lol, probably an hour or two, the tools are small. I have a 3 slot GPU which this does not work with unless you raise the top frame slightly so it’s not flush. It doesn’t look the best but it works barely. If you have a 3 slot GPU do yourself a favor and get the MATX version and not ITX. Overall I’m happy with the small footprint, but this is a very basic open air frame.
A**R
A Real Honest Non Vine Review
Now, unlike 100% of Amazon Vine reviewers, I will give you an honest review, since this case has been bought with my own money.First, assembly is both time-consuming and tedious, as the instructions aren’t clear in some cases, so you’ll be winging it on some occasions. However, in my opinion, once fully assembled, it’s a gem of your hard work and labor, and you get the benefits of an open-air case for a reasonable price. That is not to say it is free of faults. As previously mentioned, the instructions are sometimes unclear and misspelled. Furthermore, while the kit comes with everything you need to assemble, the parts feel rather cheap, especially the vertical brackets and L joints connecting them together. The screws will loosen and wobble, which could be resolved by better support brackets or even thread locker, but that is somewhat excusable for its price.Now, should you buy this? Well, if you like to be hands-on with your PC cases and have some free time on your hands, then go right ahead. If not, I recommend any other PC case, such as the Cooler Master Qube 500 Flatpack.
J**A
Excellent
Best bench frame ever.
E**A
Good frame for price
Good pc frame i was expecting it to be cheap and flimsy but its pretty sturdy. Does take like 1-2 hours to assemble but after you're done its pretty satisfying to look at
B**N
Fun little thing, but could be better
TLDR Pro:- Open platform; versatile (ish)- Plenty of parts/mounting hardwareTLDR Con:- GPU bracket weakness (lack of support bracketry)- Overall dimensions too small (more in "notes" section)- Materials scratch easyExperience:- The instructions are online via QR code. They aren't the best. Iffy English but you can follow it well since there are pictures. You do get all the parts listed. I ended up with a lot extra since no sata SSDs or remote cooling.- ** When they say to plan out the build before hand, DO IT. The kayak-track mounts need to be inserted into the beam groovesbefore the main frame is secured - you'll be taking taking it partially apart a lot otherwise (ask me how I know).- For a purpose built mATX chassis aimed at versatility in mounting, it's a bit limiting (more in "notes" section).- More of a gripe, they provided this nifty little piece of (laminated?) construction paper with a few holes punched out that align with the 3 left-edge screw holes of a mATX motherboard so you can properly align those motherboard posts on the beams. This was nice! ... but only for those three posts. Would have been way nicer to have a full template because I had to eyeball the rest.Build quality:- I'll say middle of the road as a whole. The metal beams are quite nice, but scratch REAL flippin' easy. The plastic mounty bits are gloss black with protective peel-off stickers. They seem fine. Screws and all threads were solid, no stripping at all.- The two buttons are momentary, non-clicky. Stupid easy to put those on and wire in (they have a dual pin connector).- The plastic end caps to the metal beams don't really work/fit. As seen in my last 2 images, I banged HARD to try and get at least one in and it still didn't sit even nearly flush. The last picture shows the plastic damage afterwards. So I won't be using them.- The GPU bracket is, I guess fine on its own but they didn't make clear how to best support the GPU on the opposite end. In the vertical position, the bracket can absolutely NOT hold up any more than a single fan GPU without extreme bending. That said, they do supply enough of the plastic mounty things to act as a "shelf", or "support finger?" lol. In horizontal position, it seems JUST ok. I trust it enough but it's not confidence inspiring. It's technically only supported by the two screws at the top of the bracket and the PCIe socket. So... handle with care.Notes:This may be partially subjective as parts and needs may vary, BUT, I think it is 1-2" too short, and 1-2" too narrow (depth wise; width is fine) for most modern parts. My particular issue is with the GPU and PSU intercompatibility. In a typical horizontal GPU configuration, my AMD ASUS Strix 5700XT extends 2-3" past the front edge of the chassis (aka, out from the face of the mobo), and this is even while the PSU is overhanging 1" on the opposite side (an SFX PSU would probably help, but still result in overhang). It's not the end of the world but surprising since this is the ONLY way "CPU air cooling" is supported (their chart says vertical GPU doesn't support CPU air cooling on this chassis). This is a little nuts to me since the dimensions *should* allow for the PSU to be fully within the frame without such a crazy GPU overhang. Which does also lead me call BS on them saying vertical mounting works without air cooling (insinuating AIO/custom water cooling. I have a AMD Stealth here. It is the EXACT same height of my NZXT Kraken X62 pump (popular Asetek AIO; 55mm). I could not imagine ANY way to mount the GPU vertically unless I maybe used an SFX PSU AND made it overhang 2" MORE (idk if that's even possible to do with the brackets). I have two images with red boxes to showcase; one where the backet is mounted on top of the beam at the furthest point, the other mounted under the beam (not in instructions, I was just trying different stuff). For the 'top' mount, the GPU is too tall and interferes with the CPU cooler (and as I mentioned, it would also interfere with most Asetek AIO pumps). For he 'under' mount, it clears the cooler but is then colliding with the RAM (and I have faily low profile ram).I used a standalone verital GPU mount to secure it in the vertical position (not in images since unrelated to the product). So it IS possible and doesn't impede airflow to the CPU, it sits in front of the fan shroud.
Z**N
For the price and quality, it does work
Easy instruction. The tools are not the best but they work. Just be gentle using them. Its better to have one your own.The customization is endless on this frame. They added screws and attachments so you can work your way around.
S**S
Great product.
The media could not be loaded. Does its job. Good quality. Affordable.
Trustpilot
1 day ago
2 weeks ago