🚚 Hitch Your Dreams—Towing Made Effortless!
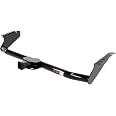
The CURT 13105 Class 3 Trailer Hitch is engineered for strength and versatility, boasting a 3,500 lbs gross trailer weight capacity and a custom fit for select Toyota Sienna models. With a durable gloss black powder coat finish and rigorous real-world testing, this hitch ensures safety and longevity for all your towing needs.
| Brand | CURT |
| Vehicle Service Type | Van |
| Material | Carbon Steel |
| Finish Type | GLOSS BLACK POWDER COAT |
| OEM Part Number | 13105 |
| Manufacturer | CURT |
| UPC | 612314131051 |
| Global Trade Identification Number | 00612314131051 |
| Model | Class 3 Hitch |
| Item Weight | 38.4 pounds |
| Country of Origin | USA |
| Item model number | 13105 |
| Is Discontinued By Manufacturer | No |
| Exterior | GLOSS BLACK POWDER COAT |
| Manufacturer Part Number | 13105 |
| Position | Rear |
C**T
Better than previous Sienna Hitch...
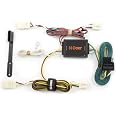
I previously owned a 2005 Sienna and installed a Hidden Hitch on it. I now own a 2011 Sienna and this Curt Hitch is a much better hitch. The fit is better, the design is better, and it just looks better.The hitch on my 2005 Sienna was purchased from a popular online hitch/trailer store. Amazon offered significantly better prices for all of the Sienna hitches, and although this other online store offered 110% price guarantee, who really wants to bother with that? Price it right the first time like Amazon does! The Hidden Hitch from this other online store came to me in basically a cardboard "bag", which resulted in one of the mounts being bent during shipping. I cannot imagine how abused this hitch was during shipping to get it to bend like that, because I had a difficult time getting it back into shape to install it. The Curt hitch came to me in huge Amazon "smile" box, no damage at all! In reading the reviews at the other online store, shipping damage is rather common, so I like that Amazon boxes these hitches.The installation was pretty straight forward. Although I did this before with my 2005 Sienna, the 2011 Sienna has that undercarriage protector that makes the otherwise easy install a bit of a hassle. I also quickly saw a flaw in the recommended install method -- if you simply cut a rectangular hole in the undercarriage protector, you will not be able to remove it with completely removing the hitch. That's just silly. So, in addition to cutting out the rectangle, I made a single cut all the way to the front edge. This not only allowed me to install the hitch and then put this undercarriage protector on afterwards, but it will also allow me to remove the protector without completely uninstalling the hitch. After looking at the finished install, I decided to drill four holes and "stitch" the cut piece back together with two zip-ties because the smaller cut section was a little flimsy since it's only attached to the stock "mini mud flap". I was worried it would rattle in the wind at high speeds, but the zip-tie solution made it nice and tight again. If I ever need to remove the protector, it's a simple matter to cut the two zip-ties.If your driveway has a significant incline, this hitch will likely scrape when entering it and leaving it. I recommend buying the Air Lift 1000 suspension kit to help with this and also improve towing and other hitch use on your Sienna. Air Lift says that it will maintain the OEM riding height of the vehicle even under a heavy load, but it actually raises the vehicle a little (when the vehicle is empty or under a light load). That helps with the hitch scraping. You can also usually avoid hitch scrapes by entering the driveway at an angle (like at the 10 or 2 o'clock position).I also installed the Curt 56106 T-Connector wiring kit. This was also very different in the 2011 Sienna, as I had to run a positive connection to the battery all the way at the front of the vehicle, which was a pain. Curt recommended running it underneath the car, but I ran it inside the cabin (under the door jams) instead."50 minutes" for a DIY install time? NO WAY! And I'm good at this kind of stuff, too. The hitch took me 2 hours (from the time I walked out to the garage to the when I was done and washing my hands), and that was without encountering any real problems. All of my bolts went in just fine by hand with a little WD-40 on them, the notching of the undercarriage protector went without incident (and the extra cut that I did only took seconds), but I'd be very surprised to find someone who could do it under an hour. It's not too difficult, but just don't expect 50 minutes, especially if this is your first time. I did take a little extra time jacking up the van and putting it on stands instead of using my ramps which would've been much faster, but that would've reduced the time by maybe 10 minutes.Edit: I agree with the comment on one other review -- you can easily do this install without ever removing the undercarriage protector -- just cut the notch with the protector still installed and then install the hitch. That would've saved a ton of time in my installation.
D**E
Fit like a glove.
Received this MONSTER of a package in the promised two days. The poor mail carrier; no way she could get it to my door by herself, so I happily helped her carry it up our stairs. Happily surprised to see it in a HUGE box, even though I did not request it to be shipped in a box. Heavy as hell!Unpackaged it quickly and found it in excellent order. I was a little apprehensive because although I had ordered the item based on my Sienna model year, I REALLY hoped this thing would fit. Have never put on a trailer hitch before.So I actually waxed the hitch before installation to protect the coating - something you can't really fully do properly after installation.So I put my rear wheels of my Sienna up on ramps, which, with cardboard on the ground (the huge shipping box would have been perfect, but I saved it in case it didn't fit), made accessing the hitch mount points easy. Ran to Ace Hardware for a 1/2" steel wire brush to fit the cordless drill. Damn, totally well spent money.I looked at the exhaust and hoped I could install without removing any of the mounts. It moved to the side surprisingly easily, so I thought it would work. Before going further, I got my air compressor hose, some hand brushes, old clothes and safety glasses and brushed off the underside of the car where the hitch would mount. Then ran the wire brush in and out of the mounting holes several times. I used a drill bit extender on the wire brush to get past the exhaust pipe (so glad I have one of those too). The compressed air kept most of the falling debris off of me. Then, before moving the hitch into place under the car, I measured the mounting holes in the car and on the rack and was VERY happy to see they matched! Once confirmed, I then tool one bolt and ran it into and out of each mounting hole in the car with my cordless drill. I just wanted to be sure each hole's threads were clear and there were no surprises. All were fine, which was nice, given the van is a 2004 - lots of time for debris, junk & corrosion to foul the threads.I then used some empty cat litter containers to hold the hitch up off the ground, and under the vehicle. This turned out working so well, I was able to install this hitch by myself. With it elevated off the ground, I raised the right side of the hitch up and slid it between the exhaust and up to the vehicle. Then put in the center bolt & washer just about four turns to hold it up. Then did the same to the left side so the hitch was suspended under the car. Then snugged them both down so the hitch was in place. Then I installed the remaining bolts, snugged them down sequentially until final torque. The only tool I was lacking was an extension for my 1/2" socket set, so I torqued with my 3/8" driver set. Only after checking two neighbors for an extension, did it occur to me that my four-way lug wrench would have worked! (Plus, you can apply torque in a true circular motion with two handles instead of just one.) Oh well, live and learn!Hitch fits just right and I'm so glad this worked out so well.Now I'm on the hunt for the right Kuat hitch rack. Only after obtaining this can I comment on the functionality of the hitch, but I can't imagine I'll have any issues. The thing's so beefy and well built, it should be bombproof.
Trustpilot
1 month ago
3 weeks ago