🚀 Elevate Your Drive with Air Lift 1000!
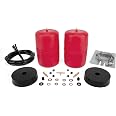
The Air Lift 1000 Air Spring Kit is designed specifically for 2004-2020 Toyota Sienna models, providing up to 1000 pounds of load leveling capacity. This kit installs inside the coil spring to eliminate sag and bottoming out, ensuring a smoother ride. With adjustable air pressure from 5-35 PSI, it offers customizable support for various loads. The kit includes two air springs, mounting brackets, and all necessary installation hardware, backed by a lifetime warranty and a 60-day satisfaction guarantee.
| Brand | Air Lift |
| Auto Part Position | Rear |
| Material | Polyurethane (PU) |
| Included Components | 2 Air springs, Mounting Brackets, All hardware needed for installation, Fully-illustrated installation guide |
| Manufacturer | Air Lift |
| UPC | 729199607325 |
| Global Trade Identification Number | 00729199607325 |
| Automotive Fit Type | Vehicle Specific Fit |
| OEM Part Number | 60732 |
| Model | 60732 |
| Item Weight | 3 pounds |
| Item model number | 60732 |
| Is Discontinued By Manufacturer | No |
| Exterior | Polished |
| Manufacturer Part Number | 60732 |
P**B
Surprisingly effective and easy to install!
My 2011 Toyota Sienna minivan was sagging in the back under load. If I used a hitch rack, pulled a trailer, or just loaded it up with people and luggage, you could see the back squatting and the hitch receiver would sometimes scrape the ground. These bags immediately solved the squat, and firmed up the ride in a very noticeable way.Upon installation, I used my compressor to air them up to 35psi. This made the ride VERY firm, like a sports car. It was fun to hit corners with no sway, but that's probably not the best setting for a minivan. I dropped it to ~25psi, which is a sweet spot for my everyday driving.These bags have now been on my van for two months, and have held at ~25psi since they were installed. No detectable leaks or failures.If you have a few tools and consider yourself reasonably capable person, you can absolutely handle this installation. The instructions are clear. There are a few helpful videos on YouTube. Don't be intimidated.One negative observation: while the hose clamps are clearly effective, they are quite flimsy and prone to damage during installation. No matter how careful I was, several of the little tabs broke off, making the difficult to move them into place. Once in place, they seem to do the job as designed.Two thumbs up. A surprisingly good value.
S**C
Still Terrific 2-1/2 Years and 30,000 Miles Later!
I purchased and installed the AIR LIFT 60732 1000 Series Rear Air Spring Kit in my 2004 Toyota Sienna in May 2013. I'm writing this review in September 2015. Bottom line, the air lifters have served better than I ever expected for over 2 years and have required no further attention. Over 40 years of tinkering with automobiles, the air lifters represent the best $100 I ever spent for any automobile part!I purchased the air lifters to keep my van level when it was fully loaded, especially when we head off on vacations. (By fully loaded I mean a typical gross vehicle weight at 5,600-5,800 pounds, which I measured for various trips on my town's truck scale.) With such a load, before the air lifters, the Sienna would ride very low in the rear, high in the front, and steering and handling became a bit wobbly. I was tired of our headlights blinding oncoming drivers at night and other drivers continuously flashing their high beams at me. Also, scraping the trailer hitch crossing sidewalks and loading and unloading from ferries terrified our dogs as well as other members of the family.The air lifters, which I typically run at 20-30 PSI, keep the van level, even fully loaded, without adversely affecting the ride. The handling fully loaded is also very stable and confident. They are fine, even when I’m alone driving the van without load. I have now driven over 25,000 miles on 3 major excursions, while fully loaded, and another 5,000 miles around town. The air lifters are going strong.Contrary to the instructions furnished with the kit, I relied on another commenter’s suggestions, and installed the air lifters so the tube connection is at the top spring mount. I recommend this approach. The key advantages are that this eliminates motion between the tubing and the chassis while positioning the tubing and connection where both are protected from sticks or rocks that might damage it if it were protruding from the lower spring mount. I ran separate lines to the driver’s side, then to the rear, and mounted the two valve stems under the rear bumper. (I ran separate lines to make troubleshooting easier in case any air leaks occurred, but none have.) It has been awhile, but I recall that installation took me a couple of hours. It’s much easier to complete if you remove the rear wheels. The only addition I made was to use steel valve caps (providing a secondary air seal), instead of the furnished plastic caps. Despite instructions that direct checking air pressure every couple of weeks, mine go months without a measurable change in pressure.Rarely am I so surprised by how good and satisfying a product turns out to be, but these air lifters solved my problem better than I ever expected. That’s darn good when you consider how little they cost. (I don't usually write reviews. This is only my second. However, the air lifters have proved so valuable to me; it seemed worth sharing my experience.)
M**W
Works well. Easy install (YouTube videos help), keeps ride level, normalizes headlamps to the road, improves handling.
Excellent product, easy to install.Users have posted plenty of good videos on YouTube demonstrating the install which makes the project fairly simple, safe, and quick.At least one of the videos demonstrates the collapse/air evacuation of the bags before installation that made a huge difference--we dimpled top and bottom of the bag and rolled it into a flattened cylinder, then pushed it between the stretched out spring coils (you must jack the wheels off the ground and support with jackstands on either side to stretch out the springs--this also makes a much safer situation for the installer).We took our time to make sure the air hose was routed away from anything that might damage it, and used the cable ties carefully to secure it to the brake lines and through the undercarriage of our 2007 Toyota Sienna. I'm posting pictures of the completed install.Ride is better; the rear of the van at the hitch is about three inches above its original height.We also mounted the inflation valve into the hitch electrical connection bracket, using a drill. Easy, fast, and convenient.Bonus benefit: Coupling the hitch ball into the trailer tongue is easier now that you can lower the rear of the van by deflating the bags, position the ball under the trailer receiver, then lift it back up by reinflating the airbags to the specified limit of 35psi.
T**.
So far so good.
I bought this kit to replace a Firestone brand kit that had sprung a leak after about 10 years. It took me about 2 hours to get the old ones out and the new ones in. I have a 2007 Toyota Sienna, and the result looks good. The van sits about 1 inch higher in the back at 20 psi, and that's where I left it for now. I do recommend planning the route for the air lines before starting work. My existing air lines were routed separately from the trailer hitch around the left side, then the right side line crossed over along the axle, which avoids going too close to the exhaust pipe. There is not enough tube in the kit to do that, so I put the provided tee near the left wheel rather than near the shrader valve at the hitch. I set the bags with the nipple facing down, since that's what was existing. It also seemed that the protective pad should be on the bottom and not the top, but maybe it's just to protect the nipple and not really against scraping the bag itself. The tubes were a bit grippy and hard to push onto the barbed fittings. I tried warming them up a bit, but decided against any kind of lube. Looks like a good result!
Trustpilot
3 days ago
2 months ago