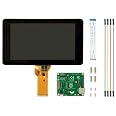
👩💻 Touch the Future with Raspberry Pi!
The Raspberry Pi 7" Touch Screen Display is a compact, high-resolution display designed for seamless integration with Raspberry Pi projects. With a resolution of 800 x 480 and the ability to detect up to 10 touch points, this display is perfect for creating interactive applications. It requires minimal connections, making it ideal for portable and embedded projects. The kit includes everything you need for setup, ensuring a hassle-free experience.
Standing screen display size | 7 Inches |
Max Screen Resolution | 800x400 |
Graphics Coprocessor | RaspberryPI |
Average Battery Life (in hours) | 100 years |
Brand | Raspberry Pi |
Series | raspberry pi |
Item model number | 7TOUCH |
Item Weight | 13.4 ounces |
Product Dimensions | 3.94 x 2.99 x 0.79 inches |
Item Dimensions LxWxH | 3.94 x 2.99 x 0.79 inches |
Rear Webcam Resolution | 800.4 Pixels |
Manufacturer | Raspberry Pi |
ASIN | B0153R2A9I |
Is Discontinued By Manufacturer | No |
Date First Available | September 8, 2015 |
J**C
Works well with 3B+ using 32&64bit Raspios current
Plug and play with RaspberryPi power supply with my 3B+ running Raspios full or lite 32&64 bit current (bullseye and bookworm). Touch screen works and is readable with a keyboard instead of onscreen keys. Mine is a test bed so I made a simple stand out of L-shaped aluminum (aka aluminum angle iron) to access the Pi easily.
L**I
This is the screen to get.
Wow! Plugged it in and it just works. No adjustments, calibration, driver loading, etc. I am running the most current version of the OS so that is probably the reason. At first I was afraid that the lower resolution would be an issue but at this size, I don't know if a higher resolution screen would make a difference. At least not for what I plan on doing with this. The photos show that the screen, posts, driver board, and ribbon cable are separated and I saw a video that says that you need to assemble all the pieces. My unit was already put together. I just inserted the ribbon cable into my Raspberry Pi.There are no instructions, but search Youtube and you'll find something.I purchased the Smarticase Case for the Official Raspberry Pi 7" Touchscreen Display - LEGO compatible front and adjustable angle and it fit perfectly. I highly recommend getting this case. Or some other case if you prefer, but definitely get something. There is nothing protecting the edge of the screen. It won't get damaged just by handling it, but leaving it propped up is just asking for trouble. Also the driver board is exposed so you are risking a short.One note. If you use this screen, the HDMI port on the Raspberry Pi is disabled. So you cannot use both this screen and a second monitor connected to the HDMI port. People smarter at this than I are working on this, but as far as I can tell, they haven't figured it out yet.
A**Q
Great display, easy to work with.
Built myself a Pi3 Touchscreen PC using this display and the new Raspberry Pi 3.. This display works as well as my Galaxy S4, and is more accurate with overscan turned off. When it boots, you may see a lightning bolt or a small icon like the boot screen (color chart).. this means this section is reporting a brownout.. the 2.5A power supply that comes in the Pi3 kit is not enough, but the 3A supply handles it just fine.This unit fits perfectly into the tilting container that also holds the Pi. The only wires I have connected to the display is the ribbon cable (handles video and touch response) and the 5V splitter.. they've included the wires to go from the 40-pin connector, but it might be better to use the 5V MicroUSB power port for it's protection.great color response, listed as 800x480, but I think it may be 720x480. Have even been able to scan barcodes from the screen. haven't played a video yet, though.For the 3A power supply:https://www.amazon.com/gp/product/B01L8DVOFM/ref=oh_aui_detailpage_o02_s00?ie=UTF8&psc=1
S**.
ZERO instructions provided!
Got one of these to use with a Pi 3 B CanaKit Raspberry Pi 3 Kit with Clear Case and 2.5A Power Supplyto run Kodi along with this case RS Raspberry Pi 7-Inch LCD Touch Screen Case, Black. The hardware works fine, but....THERE IS NO SETUP INFORMATION WHATSOEVER! Inside the box is a large sheet of paper with "safety" information in every language known to man, but ZERO information on how to connect this thing to a Pi board! Connecting the ribbon cable is pretty much self-explanatory, but the minor detail of how to provide power to the device is nowhere to be found. You have the manufacturer's website printed on the box but that's the top level URL. After searching and drilling down several layers you can find setup information where you are told that you can use two of the provided jumper wires to pull power from the Pi board.The next minor detail is that if you use the housing linked above like I did to make a nice compact package, you find that the display is rotated 180°. The case's feet and holes for wall mounting won't work with the native Raspbian configuration. It's not a simple matter of rotating the display in the housing as housing is made for a specific orientation. There is a workaround, but you have to spend some time searching for it.Finally, I was hoping for a compact unit that I could run without having a keyboard or my monitor/TV connected to it all the time. Apparently, with this display connected, the Pi's HDMI port is disabled. So...I guess I'll be putting this display back in its box (which thankfully I did not trash) and putting the Pi back in the small box that came with the kit. In the future, I might buy another Pi kit if I want to do something else.
J**N
Works great.
Make sure you have the cable ribbons/display ribbon too plugged in facing the correct sides. If not you will not even see the screen power on when the power is plugged into it.
W**W
Nice display for your Raspberry Pi project
I originally purchased this display to use with Octoprint to install my 3D printer.I went with this screen because it is the "official" touch display for a Raspberry Pi and as such the drivers are build into the OS and I wanted a larger screen.Overall I found the setup to be fairly straightforward. I Googled and found several walkthroughs that not only helped me connect the display but configure the Raspberry Pi for my specific application.My only complaint and this is more for the Raspberry Pi then the touch screen is with the ribbon cable installed for the screen, it can be difficult to access the SD card on the Raspberry Pi.I found the touch screen is bright and has a wide viewing angle. The touch interface was both accurate and fairly responsive.
Trustpilot
1 month ago
2 weeks ago